Definitely a work in progress, these rules are very incomplete and subject to change on a battle by battle basis. 'New' rules will be added (ie, made up) when needed. Morale especially is at a very early stage of development - the 'rules' here should be treated with a massive degree of caution. However, it is the boundaries that are the most likely areas to be subject to change. I will emphasise that the rules as standing have only been posted now as a result of answering an interest expressed - many individual parts are based on past experience but haven't been specifically tested as to their effect on the battle!
Troop Types
A Class - Mainly British Guard heavy cavalry and fanatics. Prone to charge on sight but will not route unless charged while disorganised or retreating.
B Class - Other elite cavalry and infantry, for example Guards, Zouaves, French heavy cavalry
C Class - the mass of trained line infantry and better quality Territorials etc.
D Class - Untrained or poorly trained troops and including Russian line infantry. Prone to charge on sight but also prone to route in panic.
Movement
Infantry normal 6" charge 9"
Heavy cavalry normal 8" charge 12"
Light cavalry normal 12" charge 18"
Artillery currently count as 'emplaced'
Movement across rough ground, etc, 3"
Movement across shallow river or through hedge requires 5,6 on D6
Firing
Ranges: Close Range Up to 12", Medium Range 12.1" to 24", Long Range 24.1" to 36"
1 D6 per figure firing except artillery. Artillery 1D6 per figure under target (template 70mm circle). Artillery do not depend on number of crew - until all crew killed or morale affects result artillery fire at full effect.
Apply modifiers:
-1 if shooter firing carbine
-1 if shooter or target moving (only one -1 applies, only applies for target moving on first round of firing)
-1 if moving cavalry firing (as well as initial -1 for moving)
-1 if shooter disorganised
-1 if firing at long range
+1 if firing at short range.
Casualties:
1,2 miss, 3,4,5 hit but saving throw, 6 automatic kill.
Troops eligible to fire:
Rifles and artillery fire over all ranges.
Carbines and machine guns short and medium range only
Handguns short range only
Machine gun (MG) crews fire as 4 infantry - thus the 2 crew of a machine gun are treated as a standard 8 man battalion/regiment.
Saving throws:
Target need 5,6 to save, 4,5,6 if in cover or skirmish order. Artillery and machine guns count as cover.
Artillery firing:
Place 70mm circle over target. Any figure under circle are potential hits.
1D6 per target figure:
Apply modifiers.
Heavy gun 4,5 hit with saving, 6 automatic kill
Medium gun 5,6 hit with saving
Light gun 6 hit with saving
Morale
Morale systems are very much a work in progress - what is presented here is basically a set of thoughts and incomplete interim solutions! This section has a number of loose definitions, for example regarding distances. Use what seems reasonable in these areas. Disorganisation is currently not defined. For toy soldier battles, I may simply ignore it...
There are currently 3 systems for determining when to take a morale test:
1) Solo, when player decides it's a good time
2) Other games, when the opposing player wants a morale test. It is assumed all units normally obey orders. However, it may be that the opponent would look to challenge this - to cause a halt or retreat, or possibly to cause the target unit to make a mad charge towards certain death!
3) According to the criteria set out below:
Criteria for 3):
First casualties taken
Attempting to charge or withstand charge (Halt two periods have completed the withstand charge!)
At half strength
Each time casualties taken when below half strength
Attempting to rally
Seeing friends rout.
Morale score
Standard 8 man infantry, 4 man cavalry unit or 2/4 crew artillery/MG pieces, roll 3D6 if full strength, 2D6 if quarter lost, 1D6 if half lost, 0D6 if three quarters lost.
3 or 6 figure units/guns 3D6 if full strength, 2D6 if third lost, 1D6 if two thirds lost, OD6 if five sixths lost.
Modifiers
+1 for each flank supported
+1 for rear support
+1 friends advancing or charging
+1 in cover
+1 enemy retiring to front
+1 enemy routing to front (additional to enemy retiring +1)
+1 B Class (optional - tester may chose to ignore)
+2 A Class
+2 D Class if unmodified dice score 15 or more
-1 outnumbered by enemy to front
-1 enemy cavalry within reach
-1 enemy charging unit
-1 shot at by enemy
-1 shot at by enemy artillery (separate to shot at by enemy)
-1 own unit halted or retreating
-1 friends retiring
-1 friends routing (additional to friends retiring)
-1 unfriendly cover nearby
-1 own unit routing and attempting to rally.(additional to own unit retiring)
-1 contacted by enemy while retreating or routing.
-2 D Class if unmodified dice score 4 or less
Results of Morale Test
16 or above: Advance/charge(if within charge move) for 2 moves towards nearest enemy - will retest if loses quarter of figures due to fire in either move.
7 - 15 Obey orders
4 - 6 Halt two periods - will return fire or receive charge, will take retest if loses quarter of figures due to firing in either move.
1 - 3 Retreat two periods. Will take retest if loses quarter of figures or is contacted by enemy troops in a charge. If contacted in a charge, 3 or below final score will convert retreat to route.
0 or below A Class retreat two periods, others rout for two periods. Retests as per 1 - 3 result. for all classes including A Class.
Assyrian army

Sunday, 29 September 2019
Saturday, 28 September 2019
1897 The Battle of the Bridge
Battle fought, won and lost. Quite a quick and bloody affair!
Thoughts on the game. Shooting is bloody but seems to give reasonable results. Artillery and morale could do with a few tweaks. Movement fine. Still need to worry about melees - need to have a few melees! So over all things seem to be working out OK.
 |
| Move 1 saw a general advance by the Alliance forces as the artillery shot at each other to no effect. |
 |
| The French advancing up the road take heavy casualties |
 |
| While Move 2 saw the British artillery decimate the Russian battery. |
 |
| The French may be taking casualties but so are the Highlanders. British cavalry rush to the flanks to sort out threats there. |
 |
| Only to find it was a wasted journey - the French cavalry are being neutralised quite effectively. |
 |
| End of Move 2 one French line regiment has been reduced to a single figure and routing whilst a Zouave Regiment is also retreating. |
 |
| The Alliance forces have reached the river and can now find some cover from the British firepower. |
 |
| The result being being that the British take heavy casualties and two Regiments decide to retreat. |
 |
| On the other hand, the French on the bridge halt while their supports also start walking back to their start point! |
 |
| And... the Highlanders and Irish Free Brigade have had enough, leaving the Lowlanders and two cavalry squadrons holding that flank... as the French cavalry are also distinctly unhappy. |
 |
| So at the end of Move 3 the French were basically all retreating except for the ones at the bridge. This bemused the Russians who could see the British centre in retreat - well, apart from the Russian artillerymen who were basically dead. |
 |
| Casualties. French 22 dead, Russians 9 (mostly artillery crew), Free Irish Brigade 3, total 34. Anglo-Scots 19. If you assume that attackers need a 3:1 superiority, the Franco-Russians did well with their roughly 2:1 superiority - they really just needed a couple more regiments in reserve and I think they would have won! However, the bridge was still in British hands so it's a British victory. |
Friday, 27 September 2019
1897 - The Scots in Ireland
At time of writing the figures have been lined up for about two days but I still haven't got round to starting the battle. That being the case, thought I might as well go through the armies. Also, without realising it I found that the British units could easily be fielded as a Scottish force, using my Fantasy Irish Regiment suggested basing the game in Ireland...
Re the intended battle, last one morale was an issue - so I'm trying a modified WRG 3rd Edition Ancients system instead.
 |
| The armies set up, Anglo-Scots (?) defending the river line from a joint Franco-Russian force. |
 |
| Some of the Russians - for some reason I missed including one infantry Regiment and one cavalry Squadron. These figures were bought off EBay and haven't been 'processed' yet apart from bases on the infantry to stop them falling over. |
 |
| Three Regiments of French line infantry and a gun - Irregular Miniatures painted by me. |
 |
| Two Irregular Regiments of Zouaves painted by Irregular Miniatures plus my made-up Spencer-Smith Irish Freedom Fighters. |
 |
| Irregular Cuirassiers painted by me following Irregular Chasseurs painted by Irregular - should really have light blue tunics at this time but... |
 |
| British heavy guns, a line regiment, grey Territorial unit (Camerons?) and the Scots Greys. All Spencer -Smith |
 |
| Grenadiers guarding the bridge, command group and machine gun at the back. Just in case the French force the (home made) bridge. Mounted general plus staff and standard. |
 |
| Highlanders and Lowlanders along the river line, flanked by some Scottish Light Horse (acting as mounted infantry) with some Lancers in reserve. |
Re the intended battle, last one morale was an issue - so I'm trying a modified WRG 3rd Edition Ancients system instead.
Wednesday, 25 September 2019
DBA - Middle Assyrian v Philistine
Straight DBA game from the lists although the figures themselves are not 100% accurate. And of course I don't follow the rules exactly either.
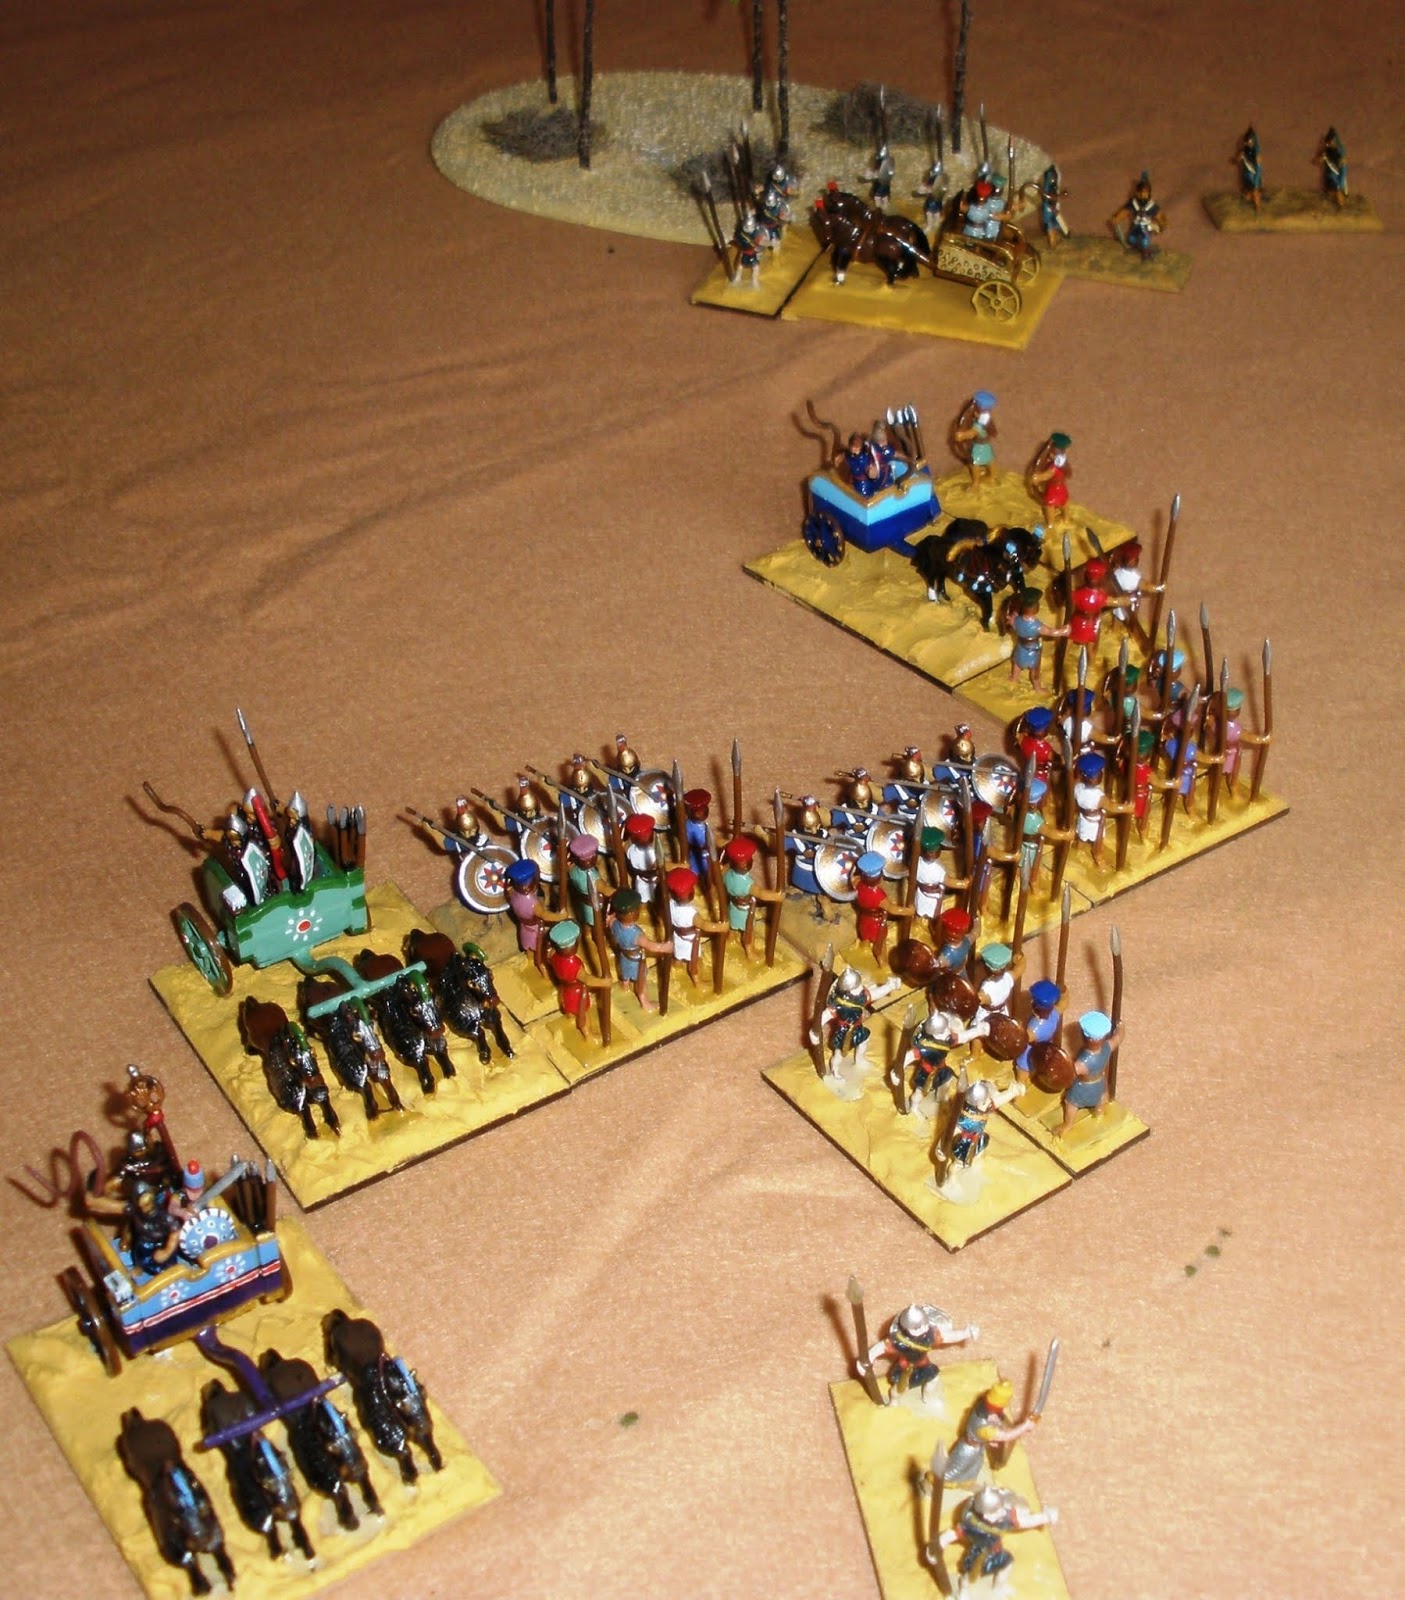
 |
| Initial setup - the trees in one wooded area are temporary as I'm using them as move markers and the ox carts are not part of the army - I don't use camps in my games unless I've got a good reason but couldn't resist placing the carts on the table! |
 |
| Philistine chariot force goes to outflank Assyrians around one wood as the Assyrians set up to hold them back. |
 |
| Except the Philistine chariots suddenly cut inside... Meanwhile Assyrians carry out their own outflanking manoeuvre. |
 |
| Centres hit as Assyrians continue outflanking Philistine left and Philistine right has forced the Assyrian flank guard to meet the Philistine chariots. |
 |
| Main one here... Assyrian light chariot and Ax elements finish up being pushed back, the chariot into the Ax, and so the chariot is destroyed! I look on 3Ax as basically skirmishers and so can get out of the way, chariots are a bit less flexible and crash! |
 |
| But the Philistine general has got himself tangled in the wood - I play it so that non-skirmishers automatically follow up. skirmishers don't.. |
 |
| Philistine left and centre is getting interesting as their right is outflanking and left being outflanked! |
 |
| The result of all this - Philistine general ends up running away while their left flank guard units die. |
 |
| With a Philistine spear element being forced to face an attack by outflanking Assyrian Ax things don't look too good. |
 |
| Assyrians lose their second light chariot but that's easily matched by the last Philistine chariot going and two Sp elements going - Sp pushed into Sp facing different way, both destroyed. |
 |
| Taking off the casualties and there's not much left of the Philistines - a win for Assyria. |
Monday, 23 September 2019
'There are Demons invading from the South'
I've been neglecting my Fantasy armies recently. Cataplana has a lot of unpainted figures and unbased chickens, other armies have never even been used...
So a Demon invasion of Catalpana seemed to be a good idea. I've used my usual system of marking moves by quickly growing a forest on the battleground!
So a Demon invasion of Catalpana seemed to be a good idea. I've used my usual system of marking moves by quickly growing a forest on the battleground!
 |
| Cataplana army includes a Griffin and some chickens as Flyers. The infantry are bulked out with a load of Irregular Landsknecht.Demons mostly Garrison 'conversions' and various (Reaper?) demons. |
 |
| First move mainly Demon Flyers using their speed to start outflanking the Cataplanans. |
 |
| As this develops, the Cataplanan Flyers join forces and head to meet the Demon left flank Flyers. Move 3 sees the first casualties and the right flank flyer has run away. |
 |
| By move 4 the Demon Flyer General has engaged the back of the Cataplanan left- that flank is looking a bit wobbly. |
 |
| Meanwhile the Demon centre and left are taking casualties. |
 |
| The position at the end of move 4. |
 |
| The mercenary pikes formed up to help close off the Cataplanan left as the Demon Beast centre is gradually giving way. |
 |
| Getting messy as three separate battle develop. The Flyer general and that Flyer that had previously run away but came back are starting to make their marks in the rear of Cataplanan units. |
 |
| The Demon centre starts to collapse... |
 |
| Followed by the Riders and remaining Flyer... |
 |
| New battle lines forming as the Catalaplanans swing round to face the Demon army. |
 |
| A few more skirmishes... |
 |
| But it's obvious that the Demon army has lost and it withdraws from the battlefield. |
Thursday, 19 September 2019
3,000 ship models - Chatham Dockyard
Last time I went to Chatham Dockyards I found that they had 3,000 (mostly) 1/48th scale builders models of ships. Sadly, they aren't usually on display... This time when I went there was an 'open day' /conducted tour...
Good news, you are allowed to take photos.
Bad news, personal use only, can't use them on my blog.
Good news, the National Maritime Museum ship model collection can be viewed on line and those pictures can be posted on my blog! Not very practical to put over 7,000 pictures here, posting a couple of random images should be enough - for the rest, best to search the original site.
One thing about the photos I took for myself - it gave me a few ideas and I think I'll be starting on a not-really- 1/76ish 'pre-dreadnaught' battleship based on the Fuji of 1896. Another possibility is a cross between the Fuji and a 3-funnelled cruiser whose name I didn't record! At over 400' long a true 1/76th scale model would be a bit bigger than my wargames version that would be a foot or - actually, a foot is roughly how long the beam should be.
The first picture is one of four scalable pictures of the Fuji in the picture archive, others just random.
Wednesday, 18 September 2019
Pulp? You have to have at least 1 cult!
Elheim figures. I might get another set of the foot soldiers, probably not quite enough here.
Still working out their storyline - got three ideas so far! And do I wait until I've got more of the figures?
 |
| Left plain and definitely wargames standard. |
 |
| I painted the cult leader as a fishman ( or whatever - at the moment sticking with the name given in the ship's log rather than Mythos...) |
 |
| Three riflemen - more useful than tommy guns to me! |
Still working out their storyline - got three ideas so far! And do I wait until I've got more of the figures?
Subscribe to:
Posts (Atom)